Wednesday, March 23, 2011

How Events Work + Messages

In this tutorial I will be showing you how events work.

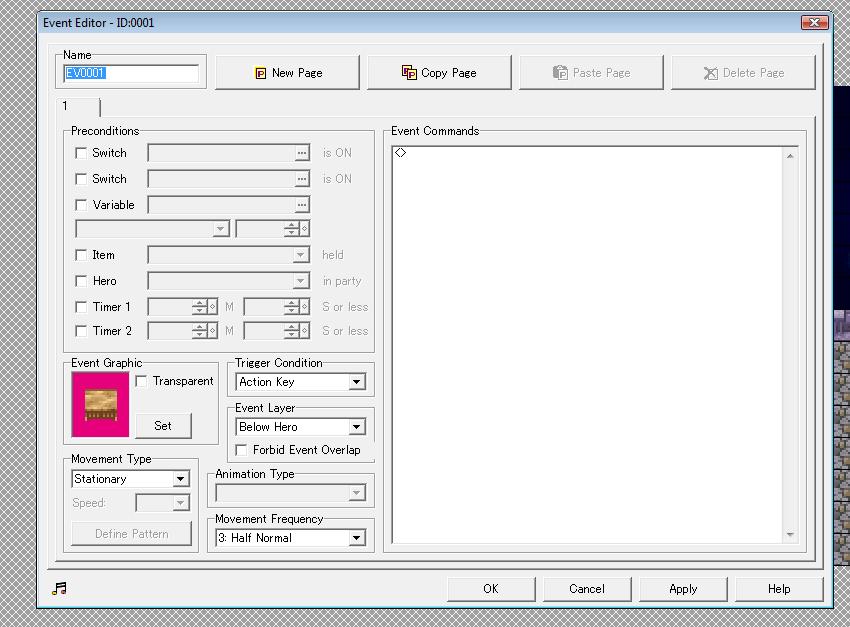
First, we will start off with how events will be triggered. This may be changed by clicking the drop down box under the Trigger Conditions in the Event Editor. These are the different types of triggers available.

Action Key: You must press Enter on the events.
Touched by Hero: You must walk over the event.
Collision with Hero: Starts the event with it moves to the hero.
Auto-Start: Starts automatically.
Paralell Process: Starts automatically yet you are still fully in control.

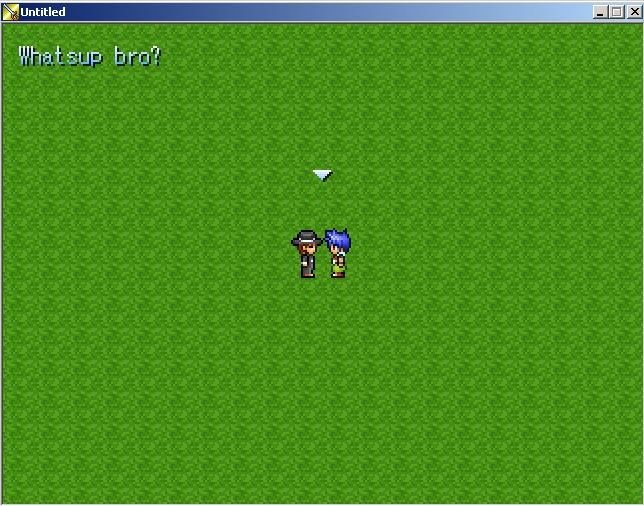
For now, we're going to start off with a basic event with messages. This is fairly simple to do. First off, create an event with a character or whatever figure you want to deliver the message. If you do not know how to do this, please go back to the previous tutorial. Once you've created the event's apearence, it is time to add the message. You can do this by clicking on the white box to the right of the event's window and selecting the first option known as "Message". Once you do that, feel free to type in whatever text you wish.


Now that you've done that, you can also customize the message box. This can be done by right clicking your previous event command and adding a new one. You'll be given the option to make the message box solid or transparent. Here are images of the two options. You can also change where you would like the message box to appear such as the top, left, or bottom of the screen. You are also given the option to let the box select where to show up so that it doesn't block out your character and allow you to continue while messages go on.


Thats not all you can do with it. You can create another Event Command in the event to select face graphics. This will help players understand who the speaker is with the character's face next to the box. This step is fairly simple since all you need to do is select the face just like you would select an event's graphics.

You're also given the option to give players choices such as "Yes" or "No". Each option can have a different outcome depending on whatever you put in the options. When you type the options you want to give them, there will be a box asking for cancellation. Checking in the chosen option will cause it to make the box cancel.

Thursday, March 10, 2011

RPG Maker 2003 Creating an Event (Character)


Now that you've created a map, you need to add events to it. Events is just as important as mapping because it was makes the game's story progress. It does so by activating switches and characters to interact with. Most importantly, it will also let you decide your starting point of the game. Let us begin the tutorial. As you can see to the right, I  have a map with no characters or anything to interact with except for the basic map. In order to add these things in, you will need to select the map you want to add events to and press F7 to activate the Event Layer Mode. After pressing F7, your map should now have square tiles across the map just like the photo I have posted.

The next thing you should do is to select your character's starting point. This may be done by right clicking one of the square event slots and selecting "Place Party Starting Position". After that, you should have an image like this on the event slot that you have selected. Make sure that the spot that you have selected is able to be walked over. If not, then you will find yourself stuck on that starting position throughout the entire adventure.


After you've selected the starting position, you will now want to add some characters to interact with. A character can be created by right clicking another event slot and selecting the "New Event" option. You should now have a window pop up that looks similar to this. You will now want to double click the picture of the table or whatever you have in the Event Graphic box and select a character that you would like for your character. For me, I will be selecting this suspicious looking man in the hat. Upon selection of the event graphic, it should love something very similar to this depending on which tab you have selected to choose your character from. There are several things you can do to this event. Under the picture you can select his movement type which will determine which general direction you would like this character to move automatically. I will explain more in the next tutorial since this one was just to explain how to create one and events are actually more complex than this.

Tuesday, February 22, 2011

RPG Maker 2003 Text Tutorial

In this tutorial you will learn..
-What tilesets are
-How they work 
Welcome to my very first tutorial on RPG Maker 2003. This tutorial will cover all you need to know on tilesets. First thing is first, and we will begin by opening you database through the program by pressing the F8 key. It should then bring you to something like this...


You database will not look exactly like this, but I have highlight and numbers the main important options from the tileset tab.

Window #1) These are your tilesets that you have. The program originally comes with five default sets such as the following; World Map, Town, Inside, Dungeon, and Ship. One fascinating feature that RPG Maker 2003 has that the other versions don't have is the option to have unlimited tilesets. This will be explained how to be done later on during the tutorial.

Window #2) This window shows how your tileset would look like in the editor. You may be wondering what those numbers are, so take a look at window #3.

Window #3) This is the editing mode which will explain the numbers on the tiles in window #2. The editing modes allow you to customize the terrain, passability, and directional pass of each tile.

-Terrain will determine what type of land form the tile is. For example, the upper left tile is labeled 9. All the way on the right you will see Defined Terrain Types. Number 9 is labeled as ocean, which makes sense because the upper left tile is a tile of water. Personally, I do not find terrain something important while creating a game. So try not to worry about it too much.

-Passability will determine whether the tile passable or not. There are four different type of passability options.

The circle option means that the tile is able to be walked over. This is usually something you would use as the floor, such as the ground or carpeting.
The square option is probably the most complex of them all. It means that the first row of something will be able to go under, but after the second row of that item it is impassable. This usually works best for walls and outdoor roofs.
 The star option means that the tile is above you which allows you to walk right under it. This usually works for indoor materials with a high top such as a book shelf.
The x option means that the tile is impassable. This usually works best for walls and other objects you can't walk through such as a table or shelf.


Window #4)
This is just the name of the tile which is only useful so that you can select the one you want easier.

Window #5) This option allows you to change a tile. Select the tileset you want to change on the left side of the database. After that go back to the tileset file option which I numbered window #5. Click on the "..." and it'll give you a variety of tiles you want to set the tileset as.

Now that we've covered the database, now let us put the tilesets to a test. On the toolbar of the program, you will be able to find three different layers of tilesets. These consist of the lower layer, upper layer, and the event layer. The layers are in order from left to right just as I listed them.

Lower layers are usually used as the floor and walls of your map. The upper layer is usually used for items such as a table, shelf, window, statue, etc. They can be placed over the lower layer. The event layer allows you to create events for cutscene pursoses and more. When you click it the screen should be covered in square tiles. Only one event cant fit per tile. I will explain events better in my next tutorial.